201-794-7700


201-794-7700
Blog
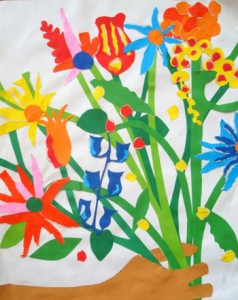
Create A Shredded Paper Flower Bouquet
What You Need:
- Watercolor paper, 11" x 17"
- Flesh-colored paper for the arm and hand
- Various shades of green construction paper for stems and leaves
- Brightly colored construction papers for flowers
- Pencil
- Scissors
- Glue stick
What You Do:
- 1. Help your paper florist trace their arm and hand on the flesh colored paper.
- 2. Have them cut out their paper arm and put it aside.
- 3. Place the white paper in a vertical, or portrait-style, position.
- 4. Now they can lay the paper hand across the bottom of the white paper. The fingers should almost touch the end of the paper. Cut down the arm part of the colored paper so it matches flush with the white paper.
- 5. Help to glue just the arm part of the cut-out to the white paper. Keep the paper hand and fingers free from glue at this point.
- 6. Together, enjoy cutting and tearing long thick and thin stems out of the green papers, then cut and tear various leaf shapes out of the green paper including big and small, round and fat, and long and thin shapes.
- 7. Arrange the stems so they're in between the "fingers" of the hand. Some of them should overlap the thumb, but all should go under the fingers.
- 8. Help your child glue down the thumb and the stems from the bottom up. Do NOT glue the tops of the stems yet.
- 9. Make the fingers appear to be "holding" the flowers by folding the fingers under and gluing them, or just cut the fingers off to give the effect of bent fingers.
- 10. Glue the fingers down.
- 11. Now they can place the leaves all around the stems and glue them down
- 12. Next, you can both tear, rip and cut colored paper into the shapes of petals!
- 13. Glue down the petals. Overlapping stems and petals will look great on this project.
Voila! Your child's beautiful collage bouquet is ready to be presented to someone they love!
*Project by Ellen Dean on Education.com